Thursday, August 22, 2013

Eggplant Parmesean and Broccolini Pasta


Believe it or not, I made Eggplant Parmesan for the first time recently. I'm not sure how it took this long for me to make it, but I have already made it several more times, and my Chief Food Critic has already declared this as a household favorite that we need to eat on a regular basis.

There are lots of options you can do for sides, you could do a simple steamed veggie, some herbed pasta, or, like I did today, a combination of the two.

You may have noticed that most Eggplant Parmesan recipes floating round require you to fry the eggplant, which adds a lot of unneeded calories to a dish that easily can be made in a healthier way.


Martha served as my inspiration for this dish, to see the original, see here: http://www.marthastewart.com/313564/baked-eggplant-parmesan

What you'll need:

Eggplant Parmesan (serves 2 adults)
1 Eggplant
3/4 cup bread crumbs
2 TBSP Italian Parsley, fresh, chopped
1 TBSP Basil, chopped
1 TBSP finely shredded parmesan
1 Egg
1/4 cup water
1 jar of your favorite pasta sauce, I recommend Whole Foods Roasted Vegetable sauce
Salt
Pepper
Olive oil

Broccolini Pasta
1 lb cavatappi pasta
1 clove of garlic, chopped
1 bushel of broccolini
1 cup diced tomatoes
1 cup loose Italian Parsley leaves, chopped
Olive oil


First off. . .make sure all babies in the vicinity are happy and being held.


Ok, now that RLG is being taken care of, to tonight's entrée. . .start by slicing your eggplant to a half and inch or less slices. Combine the egg and water in one dish, stir and set aside. Combine the breadcrumbs, parsley,  basil and parmesan in another dish.
 
Prepare a cookie sheet by coating with olive oil and preheat your oven to 375 degrees.
 
Take each slice of the eggplant, dip in the egg mixture, turn over, let the excess egg drop off, then drip in the breadcrumb mixture to cover. Place the eggplant slice on the cookie sheet, repeat with the remaining slices of eggplant.
 
Bake the eggplant for 20 minutes, flip all the pieces, bake for another 20 minutes, then remove from the oven.


Raise the oven heat to 400 degrees.

Prepare a baking dish by coating the bottom with some sauce, then layer eggplant slices with mozzarella slices and more sauce, topping the top (sorry, there has to be a better way to say that then "topping the top" but I have baby brain at the moment and "topping the top" is the best I have), with some shredded parmesan.

Bake for another 15-20 minutes. Let stand for 5 minutes.
 
YUM!!! But wait. . .we still need our side dish!!!


While the eggplant is baking, bring a large pot of water to boil, add the cavatappi and boil until tender. Drain, set aside. 
 
In a separate pan, heat some oil and sauté the broccolini, add the diced tomatoes and continue to cook until warm.
 
Return the pasta to the pan, add the broccolini and tomato mixture and sprinkle with olive oil and salt and pepper to taste.


And now, time to eat!


Monday, August 19, 2013

Introducing RLG - Real Little Guy

Greetings! I know, it's been a while since I have posted, the last few months have been a little hectic at our house, we had a new bundle of joy join our family, so as you can imagine, the last few weeks of the pregnancy I wasn't too energetic where new recipes were concerned. I did cook a lot of our favorites, but nothing post worthy.

Little Girl, RLG, and Little Guy. . .this was taken around 9:30 in the morning, after dragging them out of bed at 3 am, the look pretty good for not sleeping much
The family before we left the hospital

Three kids with three handmade blankies from their aunt

Before we jump back into the kitchen though, let me introduce, Real Little Guy. . .or RLG as we've been calling him. We opted to be surprised this time around since we already had a girl and a boy.  So far, everyone seems to be getting along well, Little Girl and Little Guy enjoy helping out as much as they can.


RLG enjoys an afternoon nap

Tuesday, May 7, 2013

4 Little Pigs


This past weekend marked the 15th Annual Flying Pig Marathon, so while we spent most of the weekend cheering on people we knew running (including our very own head food critic who ran multiple races over the weekend). When we weren't logging miles spectating and cheering, we were having a piggy themed celebration of our own, as Little Girl turned 4 this week!
 
For dinner, I made the Mushroom and Kale pasta I posted last month along with this piggy shaped foccacia bread.

Starting back at Christmas when I made a cute checkerboard cake, I started being given requirements for this weekend's birthday cake. As you can imagine, after planning a cake for 4 months, there were a lot of things, so I started working on the fondant early. If you haven't made your own fondant yet, it's worth it to try, I made a marshmallow fondant, which is a  lb bag of powdered sugar kneaded into a 16 oz package of marshmallows with a dash of vanilla flavoring. It does take some time to knead together and it's definitely sticky work, but if you coat your hands with shortening first (sounds yucky, but Crisco hands are a lot better than the sticky alternative). Once it's combined, you can refrigerate it until you're ready to use it, just bring to room temp and color.

As you can see, I divided mine to use a couple different colors, the background was a light lavendar, the ribbon and bow around the base were plain white, with a dark purple and pink polka dots.
 

 Did I mention there were pigs on top? Back to those in a minute


 Here are the kiddies cheering on the runners, they were troopers getting up early both days and walking all over downtown.

 There's our runner!! Go Daddy go!!!


Here's the top, I could definitely work on my smoothing skills, the base coat of butter cream (pink in case you were wondering) was not very smooth, and I should have thought about the impact that would have on the finished product, but now I know for next time.

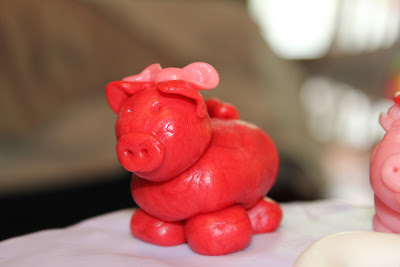
On top, you'll see 4 little pigs. . .they're actually made from starbursts!  Each one took about 8, melted in a bowl for about 10 seconds to soften, then kneaded together and shaped to make little pigs. I made them a week before so they would set up and hold their shape.
 
 
Hope you had a great weekend!
 

Friday, May 3, 2013

Mac and Cheese (with veggies)


I have always loved macaroni and cheese. . .not the stuff that starts in powdered form, but the real the real stuff. I don't know why it then took me so long to think to add vegetables in it,it's so obvious and a great way to turn a side dish into a robust entree. Over the last couple months I have made 4 - 5 different types of macaroni and cheese with a variety of vegetables and cheeses. Largely, the variety of cheese has been based on what I have on hand that particular day. Today however,  spent some time with the cheese expert at the Murray's counter at Kroger and ultimately settled on a mix of Dutch Gouda Block and Collier's Welsh Cheddar, I then used a sparse amount of parm for the topping. The right cheese combination definitely makes a huge difference.

By the way, has anyone else noticed that Kroger isn't giving out stickers anymore? It's quite annoying, the kiddies love getting stickers at the checkout counter and gave the little people something to look forward to when going to Kroger. We do most of our shopping at either Kroger or Whole Foods, I tend to have better luck with cheese from Kroger though (the ones with the Murray's counters), for some reason I find my cheese from Whole Foods turns moldy really fast on a consistent basis, I know we have to travel a ways to get there, but the rest of our dairy products always survive the drive. Anyway. . .back to Mac and Cheese!

 What you'll need:

3 TBSP butter
1/4 cup Whole Wheat flour (or AP if you prefer)
3 1/2 cup whole milk
4 oz Gouda (I used the Dutch Gouda Block)
4 oz white cheddar (I used Collier's Welsh Cheddar)
2 TBSP parm
1 cup bread crumbs
Salt
Pepper
Olive oil
1/2 onion, sliced and halved
16 oz Mushrooms, chopped
5 Sun dried tomatoes, sliced
6 oz fresh spinach
1 lb rotini pasta, cooked, al dente

Start my heating a large pan over a medium heat, add the butter and melt. Once the butter is melted, whisk in the flour to make a rouxe. Continue to heat for 3 minutes. Add your milk and whisk. Bring to a boil, stirring often, then reduce to a simmer for 25 minutes.

While the milk mixture simmers, roast the mushrooms with a drizzle of olive oil and salt to taste for 20 minutes at 425 degrees.

Meanwhile, cook your pasta per instructions on the packaging.

And further meanwhile, saute the onions until golden brown, remove from heat and spread across the bottom of a rectangular baking dish.

Once the pasta and mushrooms are done, drain the pasta and add the mushroom, spinach and sun dried tomatoes to the pasta and stir to combine. Once combined, add to the baking dish with the onions.

After the milk has thickened, add the Gouda and cheddar, stir until melted, add salt and pepper to taste.

Pour the cheese mixture over the pasta mixture, spreading it evenly. Then top with breadcrumbs and Parmesan cheese.

Bake at 350 degrees for 20 minutes.

Let it sit for 10 minutes before serving. Enjoy!


Wednesday, May 1, 2013

Cake Pops. . .the story of a failed dessert

I cook a lot, and with cooking a lot I have found the more I cook, the better I am, but inevitably there are still failures that occur with anything new that you may try. After eating a couple cake pops from Starbucks, looking at a number of books that detail how to make various cute and artistic versions to make a cake pop look like anything from a duck to a mini cake and perusing pinterest, I was convinced that I too would be able to make beautiful cake pops, and while I thought making them look like an animal would be too time consuming (note, I had full confidence that I could make them look like ornate animals if I wanted to spend the time. . .)

This is what I was going for. . .


This is what I made. . .


So, I made some cake pop, the cake was good, I used a box funfetti mix, since I knew the cake would be demolished I couldn't see putting the time in to make it from scratch. . .I refuse to use canned frosting, so i opted to try a peanut butter marshmallow cream filling, it actually turned out fine too. I mashed the cake, added the filling, shaped the balls and froze them to set, then things started to go downhill. Turns out, if you have too much filing and not enough cake in your cake balls, they don't become solid enough, so covering them in candy melts becomes an impossible task. As you can see from the photos, I could not get it completly cover the cake ball without using massive amounts of candy coating each, and the ones I did that with started to weigh so much, they started to fall apart.


So, after several hours of effort, lots of dishes and a colorful sticky mess, we ended up going out to buy a Dairy Queen cake. Not my pick of dessert, I tend to prefer cake to ice cream, so I would have been happy with a Cold Stone ice cream cake if I had to go the ice cream cake route, but I was overruled. I have a round cake covered in fondant with decorative pigs planned for this weekend, cross your fingers and wish me luck.

Thursday, April 11, 2013

Portabella Kale Pasta

So, I don't know how dinner planning goes at your house, but almost every day between 3 and 4 I receive an email from my Chief Food Critic asking what we're having for dinner. (Never mind the fact that half the time I have already told him or sent a weeks work of menu items to him, I still get the email). He was actually gone for a golfing man-cation for the first part of the week, so I didn't have as much time to pull together a formal plan, but, I knew we still had a good deal of produce from our CSA delivery last week, so I started thinking.

Ultimately, I decided we could utilize a number of the CSA items (Kale, Portabella, Basil and Onion to be exact) in one pasta dish. The Little Guy decided to take an extra long nap today, which meant he hasn't been awake long before we got home, which equates to him wanting to be hugged or touching me at some point the entire time I'm cooking. Nice and sweet, but it makes it challenging to photograph the preparation process, sorry!


What you'll need:

2 Portabella mushrooms, diced
1.5 cup Kale, chopped (about 6 leaves)
1/4 cup onion, minced
12 oz bowtie pasta
1 1/4 Vegetable broth
Salt and pepper to taste
2 TBSP Olive Oil
4 oz shredded asiago cheese

Start by bringing a pot of water to a boil.

Heat a pan, add olive oil. Once heated, add your onion and mushrooms and saute for about 5 minutes. Add the kale, and stir until wilted.

Add your pasta to the boiling water and cook until tender.

Back to your mushroom and kale mixture, add half the broth and cook until the liquid reduces by half. Add salt and pepper to taste.

Drain your pasta, set aside.

Add the remaining broth and basil, bring to a boil for about 4 minutes.

Add the pasta and cheese to the kale mixture and stir. Serve as soon as the cheese has begun to melt.

Enjoy!


Wednesday, April 10, 2013

Quinoa stuffed peppers


SO. . .I decided to get cooking again. It's been a busy couple weeks, the kids each had the flu (Little Girl first, then Little Guy, although he had a very mild case), then Little Guy decided to stop using diapers, so that has been an adventure as well, he's doing pretty good now, but it was a rough start. So, I haven't had as much time as I would like to cook, but in between all the illness and potty training, I managed to make these yummy stuffed peppers. My first task was to get my pesto bread started, since it take several hours to rise, I knew I would need a good head start, and while I was kneading away, I decided I would try a new variation of stuffed peppers for lunch.

You may have noticed from my ingredient photos that I keep a lot of my dry goods in glass jars. Well, in the process of filling my quinoa jar yesterday, I ended up with a cup that wouldn't fit in the jar, and it was in an unsealable bag (it was supposed to be a sealable bag, but silly my cut it off when opening thinking it would all fit). So, instead of the traditional rice, I started with a quinoa base, and then opted for a more Italian/Mediterranean type stuffed pepper filled with onion, mushrooms, tomatoes and spinach.


What you'll need
3 bell peppers, halved
1 cup qunioa, rinsed
1 1/2 cups vegetable broth
Olive oil
Salt to taste
1 onion, chopped
1 pint mushrooms, chopped
2 tomatoes, chopped
2 garlic cloves, minced
2 cups fresh spinach, chopped
1/4 cup bread crumbs
Balsamic Vinegar

Ever wonder what's going on while I'm taking pictures of produce? Well, here's Little Guy, he was in a chair to the yelling "Cheese" the entire time, I guess he didn't think the tomatoes were looking their best. . .He also took it upon himself to remove the stickers from all the peppers, he's just to finding stickers in books, but was quite happy to learn that he can also get stickers from our fruits and veggies.

 And further out of the picture, but always by my side when I'm cooking something that smells yummy, here's our furry friend, checking things out.


Back to the recipe! Start by combining your broth and quinoa in a sauce pan, bring to a boil and then cover and simmer until the liquid has been absorbed (about 15 minutes).

Meanwhile, heat a saute pan over a medium heat, add some olive oil. Add your chopped onion and garlic, stirring occasionally. After 8 minutes or so, add your chopped mushrooms, cook until softened.

Add the tomatoes, stir to heat. Then add the spinach and cook until wilted, salt to taste.

Once your quinoa and vegetables are done, combine them with the bread crumbs in a large bowl.

Line a baking dish with the pepper halves, spoon the quinoa mixture into the peppers, and drizzle with balsamic vinegar.


Bake for 30 minutes at 350 degrees.
Dig in!

Sunday, April 7, 2013

Kentucky Horse Park

Some how, I have managed to live with in 90 miles of Lexington, KY my whole life and I never knew they had a fun horse park there and offer a variety of attractions from pony and horse rides to retired champions. . .ever wonder what happens to Derby winners after they're too old to mate? Well, apparently, some of them live out their senior days at the Kentucky Horse Park where they are paraded out into a small viewing area a couple times a day, where they can relive their youth through a video reel of their glory days and then get applauded by those of us who grew up cheering for the likes of Go for Gin and Funnycide.
 
 
We decided to make it an impromptu family outing, and what a fun day we had. We started by saying hi to a tiny pony that was wondering around outside the Kids' Barn (the pony wondered away before I got the picture taken).
 

Then the kiddies were able to put their dressage skills to work, Little Girl and Little Guy's cousin, Little C was a natural in tackling the jumping obstacles.

Oak Barrel Horses
 For some reason, Little Girl was obsessed with leaves this weekend, so you will notice her holding one in most of the pictures. . .it's not the same one, she picked up several through the course of the day.

9.3 hands tall! How tall is the Little Guy you ask? Well, we would all love to know, but he screamed and sank to the ground every time we put him near this picture for some reason.

He however, LOVED the random coloring station set up right behind the horse picture seen above.. .
 There are a number of museum type exhibits at the Kentucky Horse Park, I have to say, as much as I typically enjoy museums and the chance to learn about something new, I think this one could use a major overhaul. The amount of text to items to view was way too heavy on the text side. The first couple rooms were also very hard for younger children to even see the exhibits, they were set several feet below the pathway, so you had to look over a waste-high wall (which was over the kids heads). Lots of neat stuff, but if you wanted to read everything, I think you could easily spend the entire day just in this one building and never see an actual horse.

These two finally found something at their eye level and were eager to see what it was. The new portion of the museum did seem to be more welcoming for younger guests.

In preparation for an upcoming pony ride, the kiddies needed to hydrate and eat a quick snack, you can see the loving help
here as Little Girl helps Little Guy get a bite.
If you were expecting to see the Little Guy on the pony, well, you weren't the only one. He was scared to death and this is the closest he got to a horse all day. . .his sister though? Come to find out, she loves horses and ponies, and the normally shy child wanted to go up to every maned creature she saw during the day.

Since the Little Guy turned out to be a big scaredy cat, Little C took an extra go around the pony track.

See? No horse was too big for her to approach and pet. This was after the Horses of the World show, this was the Spaniard.

Little Guy found a someone to hug him while I snuck off to take a picture of his sister, thank goodness his aunt had free arms, he might have died if he had to stand for 2 minutes.

Did I mention they had a horse drawn trolley ride?


And after a long day of walking around, pony rides and more sun then any of us have seen in months, we went to Chuy's for dinner before we all went our separate ways.
It was a fun, long day, the kiddies and I were still tired most of the day today, so tired, they were in bed around 7:30pm, YEAH!