Tuesday, May 7, 2013

4 Little Pigs


This past weekend marked the 15th Annual Flying Pig Marathon, so while we spent most of the weekend cheering on people we knew running (including our very own head food critic who ran multiple races over the weekend). When we weren't logging miles spectating and cheering, we were having a piggy themed celebration of our own, as Little Girl turned 4 this week!
 
For dinner, I made the Mushroom and Kale pasta I posted last month along with this piggy shaped foccacia bread.

Starting back at Christmas when I made a cute checkerboard cake, I started being given requirements for this weekend's birthday cake. As you can imagine, after planning a cake for 4 months, there were a lot of things, so I started working on the fondant early. If you haven't made your own fondant yet, it's worth it to try, I made a marshmallow fondant, which is a  lb bag of powdered sugar kneaded into a 16 oz package of marshmallows with a dash of vanilla flavoring. It does take some time to knead together and it's definitely sticky work, but if you coat your hands with shortening first (sounds yucky, but Crisco hands are a lot better than the sticky alternative). Once it's combined, you can refrigerate it until you're ready to use it, just bring to room temp and color.

As you can see, I divided mine to use a couple different colors, the background was a light lavendar, the ribbon and bow around the base were plain white, with a dark purple and pink polka dots.
 

 Did I mention there were pigs on top? Back to those in a minute


 Here are the kiddies cheering on the runners, they were troopers getting up early both days and walking all over downtown.

 There's our runner!! Go Daddy go!!!


Here's the top, I could definitely work on my smoothing skills, the base coat of butter cream (pink in case you were wondering) was not very smooth, and I should have thought about the impact that would have on the finished product, but now I know for next time.

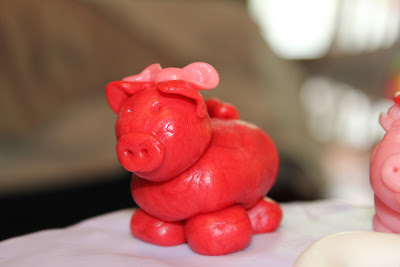
On top, you'll see 4 little pigs. . .they're actually made from starbursts!  Each one took about 8, melted in a bowl for about 10 seconds to soften, then kneaded together and shaped to make little pigs. I made them a week before so they would set up and hold their shape.
 
 
Hope you had a great weekend!
 

Friday, May 3, 2013

Mac and Cheese (with veggies)


I have always loved macaroni and cheese. . .not the stuff that starts in powdered form, but the real the real stuff. I don't know why it then took me so long to think to add vegetables in it,it's so obvious and a great way to turn a side dish into a robust entree. Over the last couple months I have made 4 - 5 different types of macaroni and cheese with a variety of vegetables and cheeses. Largely, the variety of cheese has been based on what I have on hand that particular day. Today however,  spent some time with the cheese expert at the Murray's counter at Kroger and ultimately settled on a mix of Dutch Gouda Block and Collier's Welsh Cheddar, I then used a sparse amount of parm for the topping. The right cheese combination definitely makes a huge difference.

By the way, has anyone else noticed that Kroger isn't giving out stickers anymore? It's quite annoying, the kiddies love getting stickers at the checkout counter and gave the little people something to look forward to when going to Kroger. We do most of our shopping at either Kroger or Whole Foods, I tend to have better luck with cheese from Kroger though (the ones with the Murray's counters), for some reason I find my cheese from Whole Foods turns moldy really fast on a consistent basis, I know we have to travel a ways to get there, but the rest of our dairy products always survive the drive. Anyway. . .back to Mac and Cheese!

 What you'll need:

3 TBSP butter
1/4 cup Whole Wheat flour (or AP if you prefer)
3 1/2 cup whole milk
4 oz Gouda (I used the Dutch Gouda Block)
4 oz white cheddar (I used Collier's Welsh Cheddar)
2 TBSP parm
1 cup bread crumbs
Salt
Pepper
Olive oil
1/2 onion, sliced and halved
16 oz Mushrooms, chopped
5 Sun dried tomatoes, sliced
6 oz fresh spinach
1 lb rotini pasta, cooked, al dente

Start my heating a large pan over a medium heat, add the butter and melt. Once the butter is melted, whisk in the flour to make a rouxe. Continue to heat for 3 minutes. Add your milk and whisk. Bring to a boil, stirring often, then reduce to a simmer for 25 minutes.

While the milk mixture simmers, roast the mushrooms with a drizzle of olive oil and salt to taste for 20 minutes at 425 degrees.

Meanwhile, cook your pasta per instructions on the packaging.

And further meanwhile, saute the onions until golden brown, remove from heat and spread across the bottom of a rectangular baking dish.

Once the pasta and mushrooms are done, drain the pasta and add the mushroom, spinach and sun dried tomatoes to the pasta and stir to combine. Once combined, add to the baking dish with the onions.

After the milk has thickened, add the Gouda and cheddar, stir until melted, add salt and pepper to taste.

Pour the cheese mixture over the pasta mixture, spreading it evenly. Then top with breadcrumbs and Parmesan cheese.

Bake at 350 degrees for 20 minutes.

Let it sit for 10 minutes before serving. Enjoy!


Wednesday, May 1, 2013

Cake Pops. . .the story of a failed dessert

I cook a lot, and with cooking a lot I have found the more I cook, the better I am, but inevitably there are still failures that occur with anything new that you may try. After eating a couple cake pops from Starbucks, looking at a number of books that detail how to make various cute and artistic versions to make a cake pop look like anything from a duck to a mini cake and perusing pinterest, I was convinced that I too would be able to make beautiful cake pops, and while I thought making them look like an animal would be too time consuming (note, I had full confidence that I could make them look like ornate animals if I wanted to spend the time. . .)

This is what I was going for. . .


This is what I made. . .


So, I made some cake pop, the cake was good, I used a box funfetti mix, since I knew the cake would be demolished I couldn't see putting the time in to make it from scratch. . .I refuse to use canned frosting, so i opted to try a peanut butter marshmallow cream filling, it actually turned out fine too. I mashed the cake, added the filling, shaped the balls and froze them to set, then things started to go downhill. Turns out, if you have too much filing and not enough cake in your cake balls, they don't become solid enough, so covering them in candy melts becomes an impossible task. As you can see from the photos, I could not get it completly cover the cake ball without using massive amounts of candy coating each, and the ones I did that with started to weigh so much, they started to fall apart.


So, after several hours of effort, lots of dishes and a colorful sticky mess, we ended up going out to buy a Dairy Queen cake. Not my pick of dessert, I tend to prefer cake to ice cream, so I would have been happy with a Cold Stone ice cream cake if I had to go the ice cream cake route, but I was overruled. I have a round cake covered in fondant with decorative pigs planned for this weekend, cross your fingers and wish me luck.